
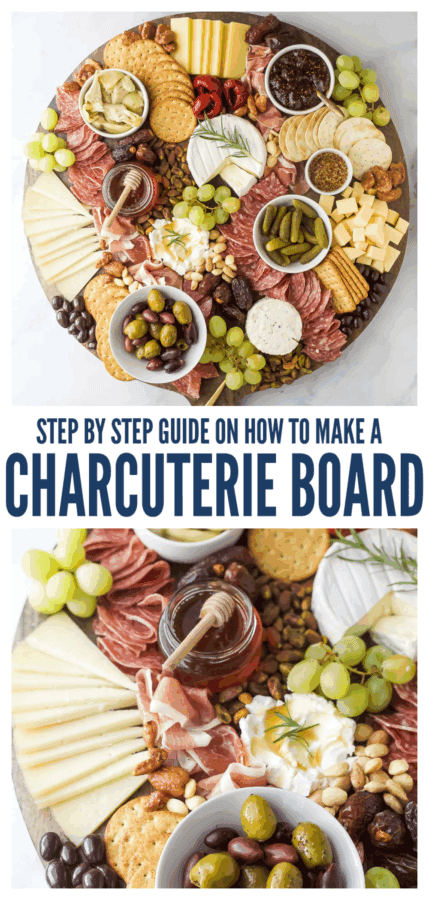
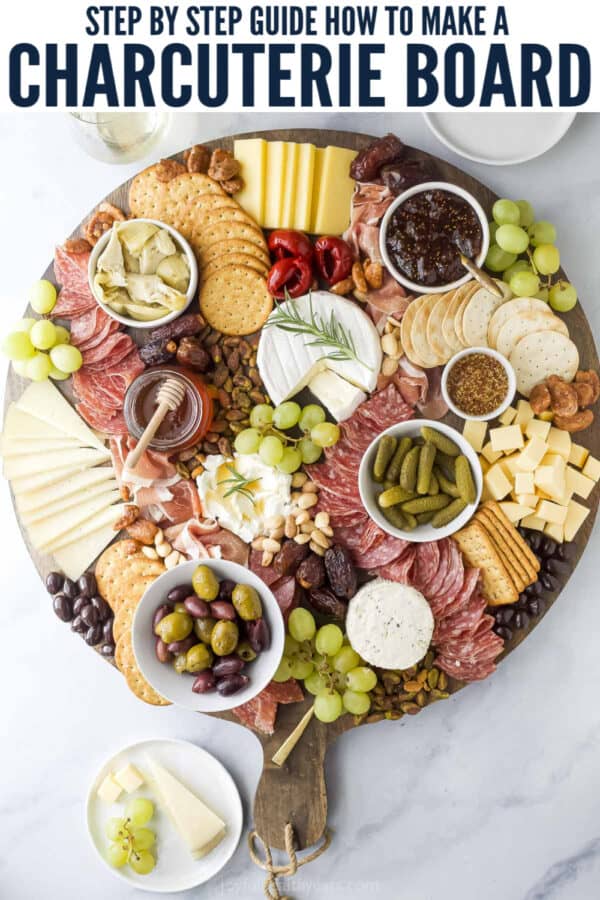
A step by step guide on how to make a charcuterie board pop and be prepared to impress your guests at any party! I’ll share my best tips for selecting meats and cheeses and arranging it to look instagram worthy on a board. You’re going to NAIL this!

Can I tell you a secret about charcuterie boards? They are absolutely no-fail—because if you put it all together and it looks bad, you can take it all off and try again. Realizing this helped me loosen up and get creative, rather than stressing and obsessing about making it perfect. So like I said in the intro, you are going to nail this, I promise!
Why Charcuterie Boards Are the Perfect Party Starter
Charcuterie boards have universal appeal! Here’s what makes them the perfect party appetizer.
- Something for everyone. Every party has guests with dietary restrictions or picky eaters, and a charcuterie board has something for everyone. With a variety of cured meats, cheeses, fruits, crackers, and nuts, there is bound to be something that suits everyone’s tastes.
- Easy to prepare. Putting together a charcuterie board doesn’t require any cooking and it’s great for making in advance, which is always a plus when you’re prepping for guests to arrive.
- A stunning centerpiece. A well-arranged charcuterie board not only tastes great, but also looks gorgeous. It instantly elevates a party by adding a touch of sophistication.
- Pairs well with drinks. So mix up a Classy Paper Plane Cocktail, French 75, or White Wine Spritzer and enjoy!

The Elements of a Charcuterie Board
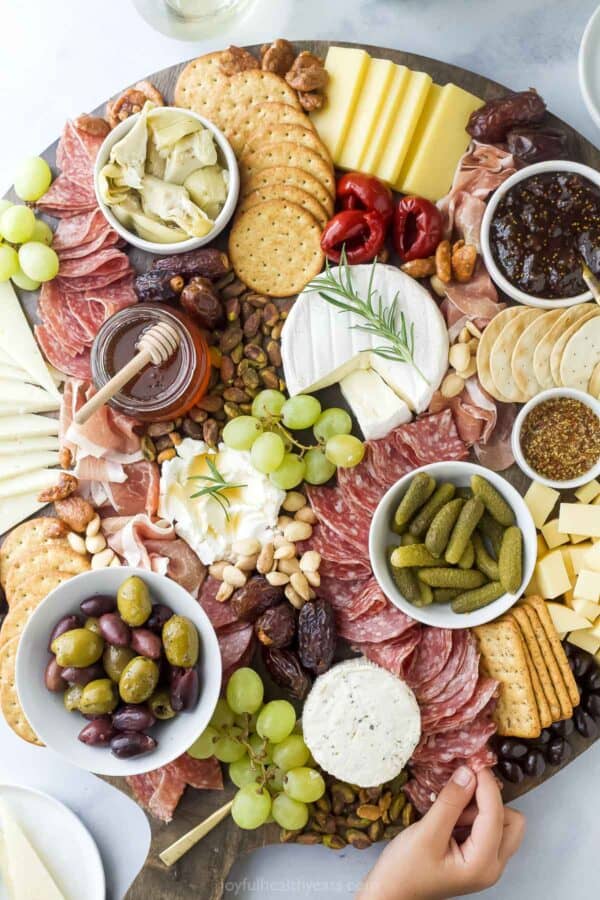
It’s easier to build your charcuterie board by breaking down the foods you’re going to add into a few main groups. Having a plan keeps you from adding 11 different hard cheeses to your grocery cart!
Start by deciding if there are any groups you want to eliminate altogether (nuts if you’ve got an allergy, for example), and from there, you can drill down to the specific items you want to include from each group.
Cheese
Okay, technically speaking, a charcuterie board is all meat, but they’ve evolved—because who doesn’t love variety? (And cheese.)
For a large charcuterie board, I will choose cheeses from each of these types:
- Soft Cheese: Brie (also fantastic for Baked Brie with Fig Jam!), Camembert, Burrata
- Semi-Soft Cheese: Havarti, Fontina, Monterey Jack
- Semi-Hard Cheese: Gouda, Manchego, Edam
- Hard Cheese: Parmesan, Aged Cheddar, Pecorino Romano
For a smaller board, you can put together a smaller selection of cheeses, but you’ll want to choose them more carefully to make sure they pair with the other flavors on your board.
When picking cheeses, balance and variety are the key factors to consider. In addition to the textures listed above, aim to include a mix of flavors and milk types (cow’s milk, goat’s milk, or sheep’s milk) to cater to different palates and create a more interesting experience. If you’re feeling shaky on how to do that, go to a grocery store or market with a cheesemonger and ask for some suggestions. They are always happy to help!
Cured Meats
Now it’s time for the actual charcuterie! Cured meats like prosciutto, salami, and soppressata are popular choices that go well with a variety of cheeses.
Selecting cured meats is easier than the cheeses simply because there aren’t as many options! But like the cheese, I try to aim for a mix of flavors and textures—some thinly sliced meats, thick slices of sausage, etc., will add depth to your board.
Crackers
I also like to include a variety here, and it doesn’t have to just be crackers—add things like baguette rounds, crostini, lavash, and anything else that would pair well with cheese and crackers.
Choose crackers that are sturdy enough to hold up to the meats and cheeses, but not overpower them in flavor—so avoid crackers that are cheesy or strongly flavored. Lightly herbed or seeded crackers can also add some texture and depth, but classic water crackers and butter crackers work too.
Nuts
Nuts are a fantastic addition to any charcuterie board, giving you a break from the cheeses and meats with a nice crunch!
Any nuts will work—cashews, pistachios, almonds, whatever!—and because you’re not going to be eating these in the same bite as the cheeses and meats, you can go for ones that are flavored without worrying so much about how they complement the other flavors on the board. This means you can throw in some candied nuts, something spicy, classic roasted and salted nuts, etc. These Spiced Candied Nuts are a family favorite!
Fruit
Fruit and cheese are amazing together and fruit really makes your charcuterie board pop! I love adding fresh apple and pear slices, which pair well with aged cheddar, dried fruits add concentrated sweetness and a fun chewy texture, and bunches of grapes are a stunner and great for breaking up the board visually.
Extras
Marinated olives are a savory, briny, and flavorful addition, as are cornichons. Both are good palate cleansers. I also like to include some items to spread, drizzle, and dip—mustards, honey, jams, and chutneys. If you want to go really fancy, include some honeycomb!
Sweet Bites
Chocolate covered almonds are my favorite for adding some decadence, but even a good dark chocolate can be a nice addition.
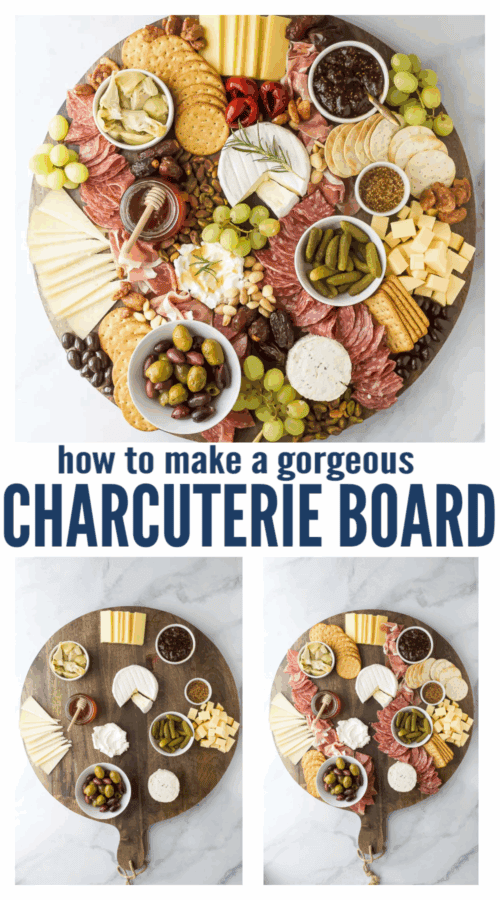
Putting It All Together
Now it’s time to assemble your charcuterie board! Let’s get started.
Choose Your Charcuterie Board
Start by selecting your board. This could be a slate board, a wooden cheese board, a cutting board, or even a large plate—whatever works for you and suits the occasion.


Place Your Extras in Ramekins
Before arranging the main components, gather your “extras,” such as olives, jams, honey, or spreads, and place them in small ramekins or bowls. Distribute these ramekins around the board.
Arrange the Cheese
Begin assembling your selection of cheeses on the board. Use a mix of cut and uncut cheeses to provide visual variety. It’s fun to have different shapes and textures—triangles of hard cheese, soft wheels left whole, or crumbled chunks. Be sure to spread them across the board to create balance and prevent crowding.


Add the Cured Meats
Next, unwrap your cured meats and start adding them to the board. Thin slices can be folded or rolled, if you’d like. Try wrapping the meat around the cheeses to make them look surrounded. You can also create a “train” of meat, running it in a line from one end of the board to the other.
Add Crackers and Toasted Bread
Now, it’s time to add your crackers, breadsticks, or slices of toasted bread. There’s no need to overthink this step—just tuck them into open spaces on the board. Laying them at an angle or stacking them in small piles can add depth to the arrangement.

Fill in the Gaps with Fruit and Nuts
Take the fruit and nuts you’ve chosen and use them to fill in any remaining empty spaces. Scatter them generously across the board to create a look that’s abundant and beautiful. There’s no specific order here; the goal is to make the charcuterie board look full and irresistible.
Step Back and Adjust
Once everything is on the board, step back and evaluate the overall look. Does it feel balanced? Is there a good mix of colors and textures? If a spot seems dull or empty, add a few berries, a sprig of fresh basil, or a handful of nuts. Remember that perfection isn’t the goal—your cheese board should feel natural and approachable, but most importantly, it should be delicious!

A Few More Pro-Tips for Making a Jaw-Dropping Charcuterie Board
Here are some bonus tips to make sure your charcuterie board is a success!
- Use color theory to create visual interest. No, you don’t have to be an art major in college to do this—just think about the colors you’re using and how they complement or contrast with each other, the same way you would with decorating your home or putting together an outfit. A mix of bold, bright colors alongside neutral shades like beige crackers or white cheese can make your board pop and look inviting.
- Stick with odd numbers. Odd numbers are more visually dynamic than even, so consider arranging components like cheese wedges, fruit, or crackers in groups of three or five. This subtle trick can make your board feel more organically arranged.
- Include some utensils. You can make things like small cheese knives and spreaders part of your board. A fancy spreader also adds visual appeal!
Making It Ahead of Time
The beauty of a charcuterie board is that it’s easy to assemble in advance so it’s ready to go when your party starts. The only tricky part is making sure you have room in your fridge! Assuming you do, wrap the board in plastic and refrigerate it up to a day before serving.
If your board is bigger than your refrigerator can accommodate, you can still get a head start by prepping all the elements and storing them in containers in the fridge so they’re ready to lay out on the board.

More Party Appetizer Ideas

How to Make a Gorgeous Charcuterie Board Step by Step
- Prep Time: 30 minutes
- Total Time: 30 minutes
- Category: Appetizers
- Cuisine: American
Description
I share step by step how to make a charcuterie board, with my best tips for selecting meats, cheeses, and more, then arranging it all to look beautiful!
Ingredients
Pick One or as Many as you Like or Have Room for on Your Board:
- 1 soft cheese (mozzarella, burrata, goat cheese, Brie, Boursin)
- 1 or 2 semi-soft cheese (Smoked Gouda, jarlsberg, blue cheese, Gorgonzola)
- 1 semi-hard cheese (manchego, provolone, comte)
- 1 hard cheese (Asiago, Aged Cheddar, Irish Cheddar, Parmesan)
- 2–3 cured meats (salami, prosciutto, peppered salami, sopressa, chorizo)
- assorted crackers
- nuts (cashews, candied pecans, pistachios)
- fruit (grapes, mejdool dates, apple slices, berries)
- extras (marinated olives, cornichons, stone ground mustard, honey, fig jam)
- sweet (dark chocolate almonds)
Instructions
- Grab your Cheese Board. (slate, wooden cheese board, cutting board, plate, etc)
- Place your “extras” in various parts of the board in ramekins.
- Assemble your cheese (cut and uncut) all over the board. I like to vary the shapes and sizes all over the board.
- Unwrap the cured meat and place them in various spots on the board. I like to wrap them abour the cheeses so that look surrounded. I also like to make a “train” of meat and carry it from one end of the board to the other. Sometimes I’ll look at my board and see where it needs a pop of color!
- Now, add your crackers or toasted bread to the board. Remember it doesn’t have to be perfect or organized.
- Take the fruits and nuts you have and fill in any open spots on the board. Place them anywhere. There is no order to this. Just make the board look super full!